
Search engine optimization of Vue.js (Quasar framework) site
Hello guys! In this article I am going to show you how to SEO vue.js (Quasar) site. So this article will guide you to make your Vue.js (Quasar) website for search engine optimization (SEO). I have created this article for Quasar framework users, But if you use pure Vue.js website you might also able to try these things. According to my opinion you might need webpack installed with your project if you developing pure Vue.js project.
When we talking about deeply, the main question for developers is how to SEO vue.js site?. SEO is a main thing which we need to do before of after publishing our site to global web. If your site SEO is not very good, Your site may not be available in search engines such as Google. So in order to make your site visible for search engines, You have to make sure your site is fully optimized for search engines. For single page applications such as Vue.js its little bit harder to SEO rather then other multipage websites and CMS such as WordPress. But by following this article I will assure your site will optimize better for search engines.
Basically, In order to make a site for search engine optimization we need following basic things included in our website as well. Those are,
- Meta tags
- Sitemap
- Robots.txt
Meta Tags

Meta tags and descriptions are mostly important to your site in order to show your URL on the search engines results. Title is used as page URL title on the result and meta description will be used as the page URL description in the results. If you familiar with HTML you might seen or placed this kind of meta tags in every page of your site. But in Vue.js its single page app which include components and templates. So you might unable to add these meta tags on each page on your site. In that case we have to go for an solution which can include meta tags for all your pages. So for the question how to seo vue.js site The following will guide you to add meta tags for your project.
Step – Add utils meta plugin
Add a new folder on src folder call utils
Create meta.js file into src/utils
Copy below code to meta.js
export default function meta () {
  const metaObj = { meta: {} }
  if (!this.metaTags) {
    return metaObj
  }
  if (this.metaTags.title) {
    console.log('title added')
    metaObj.title = this.metaTags.title
    metaObj.meta.ogTitle = { name: 'og:title', content: this.metaTags.title }
    metaObj.meta.twitterTitle = { name: 'twitter:title', content: this.metaTags.title }
  }
  if (this.metaTags.description) {
    console.log('desc added')
    metaObj.meta.description = { name: 'description', content: this.metaTags.description }
    metaObj.meta.ogDescription = { name: 'og:description', content: this.metaTags.description }
    metaObj.meta.twitterDescription = { name: 'twitter:description', content: this.metaTags.description }
  }
  if (this.metaTags.url) {
    console.log('url added')
    metaObj.meta.ogUrl = { name: 'og:url', content: this.metaTags.url }
    metaObj.meta.twitterUrl = { name: 'twitter:url', content: this.metaTags.url }
    metaObj.meta.canonical = { rel: 'canonical', href: this.metaTags.url }
  }
  if (this.metaTags.image) {
    console.log('image added')
    metaObj.meta.ogImage = { name: 'og:image', content: this.metaTags.image }
    metaObj.meta.twitterImage = { name: 'twitter:image', content: this.metaTags.image }
  }
  return metaObj
}
Open quasar conf file
Require path at top of the file
const path = require("path");Then under build under extend webpack (cfg)
extendWebpack(cfg, { isServer, isClient }) {
        // cfg.module.rules.push({
        //   enforce: "pre",
        //   test: /\.(js|vue)$/,
        //   exclude: /(node_modules|quasar)/
        // });

        cfg.resolve.alias = {
          ...cfg.resolve.alias, // This adds the existing alias
          // Add your own alias like this
          utils: path.resolve(__dirname, "./src/utils"),
        };
 }
Add Meta plugin to plugins section of the quasar conf
plugins: ['Meta'],Now go to one of your web app pages
in the script section first import the util
import meta from '../../utils/meta.js'In export default section
export default {
  name: 'PageIndex',

  data() {
        return {
            metaTags: {
                description: 'NsrTech Dashboard...',
                title: 'Dashboard | NsrTech',
                url: 'nsrtechx.com/dashboard',
                image: '#'
            }
        }
  },
  meta,
}
Place above code for all your pages and change relevant changes as your app
Sitemap
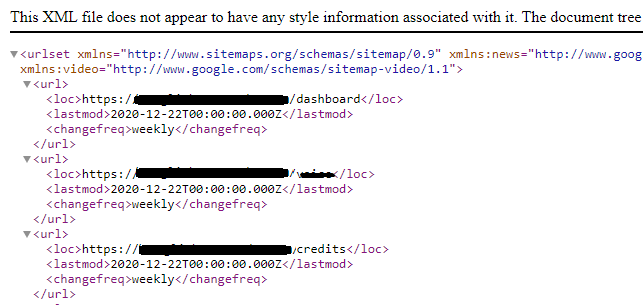
A sitemap is very important to a web site in order to make the site SEO friendly. Basically sitemap is used by the search engines to crawl the website. When a search engine start to crawl your site, it first goes to your sitemap to see the pages and contents URLs because most of the search engines uses bots to crawl your website and they have no idea where to go for your pages and contents. So they search the URLs which in the site map and crawls the contents inside the URLs. In that case your sitemap need to be more accurate and reliable in order to make your URLs visible on search engines. If there is a URL on broken URL which gives a 404 page, the search engine rejects the page from crawl.
So lets see how to create a sitemap file to your quasar project. Follow below steps.
Step – Add sitemap plugin
Add sitemap package
npm users
npm install sitemap-webpack-plugin --save-dev

yarn users
yarn add sitemap-webpack-plugin
Go to quasar conf
At top of the quasar conf file
const SitemapPlugin = require('sitemap-webpack-plugin').default

const paths = [
  { path: '/dashboard' },
  { path: '/about' },
  { path: '/credits' },
  { path: '/contact' },
  { path: '/download' }

]
place all paths for your pages from router file into path array
Under build inside extendwebpage(cfg) function, (same location you configured meta)
Add following code after the meta code you placed before
cfg.plugins.push(
          new SitemapPlugin({
            base: 'https://nsrtechx.com',
            paths,
            options: {
              filename: 'sitemap.xml',
              lastmod: true,
              changefreq: 'weekly',
            }
          })
        )
Make sure that above code is inside extendWebpack function
Now when your build your website or web app, It will automatically create a sitemap file for you. You can check it by typing your-domain/sitemap.xml
Robots.txt
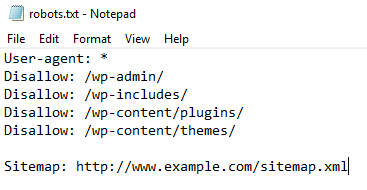
Robots.txt file is required in the website in order to give permission to access and crawl your site. Some people want to crawl their site to only some agent (search engines). So they can specify the agents which they need to be crawled by. Or users can allow all agents to be crawled by their search engines as well. So before crawling your site another main thing search engines check is your robots.txt file. And if the user is allowed that agent only they crawl the site with their search engines. else they leave the crawl. So if you want your site to be crawl in all search engines, You have to allow all agents. Now lets see how to create a robots.txt file for our site.
Step – Add webpack copy plugin
Add webpack copy package
npm users
npm install --save copy-webpack-plugin@5.1.1

yarn users
yarn add copy-webpack-plugin@5.1.1
Create robots.txt file in src/assets and add data
Example robots.txt file
# robots.txt
User-agent: *
Allow: All
Sitemap: https://nsrtechx.com/sitemap.xml
Go to quasar.conf and at the top of file
const CopyWebpackPlugin = require('copy-webpack-plugin')under build under extendwebpage(cfg). (same location you configured sitemap)
Add following code after the sitemap code you placed before
 cfg.plugins.push(
    	new CopyWebpackPlugin([{ context: `${__dirname}/src/assets`, from: `*.*` }])
      )
Make sure that above code is inside extendWebpack function
Build the app.
quasar build -m pwaWe are using CopyWebpackPlugin to move the robots.txt file (all files on src/assets) to root folder when building the app .So by doing that you can view your robots.txt file from www.yourdomain.com/robots.txt
So now you can link your website to SEO platforms of different kinds of search engines. For an example,
https://search.google.com/search-console/
Thats it! I think you got an idea about SEO of Vue.js (Quasar) apps and you might successfully optimized your site for search engines.


